Imagine you will never have to scroll through the Lightroom sliders again. Instead you will be able to access each slider right at your fingertips. You could keep your eyes on the photo and work with your fingers directly on the image.
The good news is: this is not a dream but already reality. With a Lightroom midi controller like the Loupedeck, you can speed up your post-processing photography workflow dramatically. You will be able to cut your editing time in half.
There is only one problem: the price for such controllers is quite high. At this moment the Loupedeck is starting at around 230€ – 300€*.
But there is also a cheaper way to operate Lightroom with midi controllers: originally, midi controllers come from the music sector. Using these for Lightroom is generally nothing new and not really expensive either.
So the the Loupedeck’s price ist just so high, because it is designed 100% for using with Lightroom. And as always for this kind of specialization you pay accordingly more.
Universal Midi Controllers cost a fraction and also connect to Lightroom.
I myself got the Behringer X-Touch Mini Controller* as a cheap Loupedeck alternative, which starts already at around 50-60€. It offers tremendous value for Lightroom users, so the price is actually a bargain in every respect. After the current hype it is often sold out, which is why I can only advise to order it directly if it should be available at the moment.
Since it’s not an explicit Lightroom controller, however, it takes a moment to set everything up. But this is not very difficult. In this blog post I will show you how it’s done.
Note: Of course, it does not necessarily have to be the Behringer controller. The Midi2LR software, which we’ll look at in a moment, lets you use pretty much any Midi device with Lightroom. Alternatives are therefore z.B. also controllers from the Korg Nano series* or Akai Midi Mixer*. I have not tested these myself and can therefore not guarantee that it works the same way – it is worth a look at the product reviews. In addition, please pay attention to relative knob markings here as well (endless).
Note: This only works with Lightroom Classic, which you can get with your Adobe Photo subscription*.
1. Advantages of a Lightroom Midi Controller
Before we get to the device, I want to talk briefly about my testing phase and the boost it gave to my workflow. The bottom line is that I experienced the following advantages over previously using a mouse and keyboard:
- Increased speed for editing large image series
- Simultaneous operation of 2 sliders at the same time
- No more annoying scrolling and unfolding of slider sections in LR
- All sliders are always right at your fingertips
- Keyboard shortcuts of multiple keys can be placed on only one button
- No more need to look away from the image to find sliders
- Great haptic feeling and directness
A midi Lightroom controller eliminates the need to constantly scroll through all the sliders (and thus take your eyes off the image for a moment). Instead, you just keep your hands right on all the controls. And in the process they become real buttons, which allows for haptic work.
After a short initial training, you hardly have to take your eyes off the picture and can watch the image being created virtually without interruption.
You will become a kind of Mozart – or rather a DJ of the colors: editing with your hands makes it pretty intuitive and you will get a very direct feel of what happens when you turn the knobs. The connection to what you are working on becomes much more direct and somehow feels »real«.
In addition to the effect of very intuitive working, there is also the enormous speed bonus. Especially with a large image series of 10, 50 or 300 photos in a row you will save a lot of time. Once you applied the same preset on the series and just begin to tweak White Balance, Leveling and Exposure, you will be much faster.
This is also the point you will realize more and more how slow Lightroom is after all – the time-limiting bottleneck is now no longer me scrolling through the sliders. But Lightroom that will often take a short time until all the commands are processed at all.
The advantage of using universal Midi Controllers with Lightroom is that you can really assign everything freely according to your own workflow. To do so, we will now take a closer look at the device.
2. The Behringer X-Touch mini Midi Controller in detail
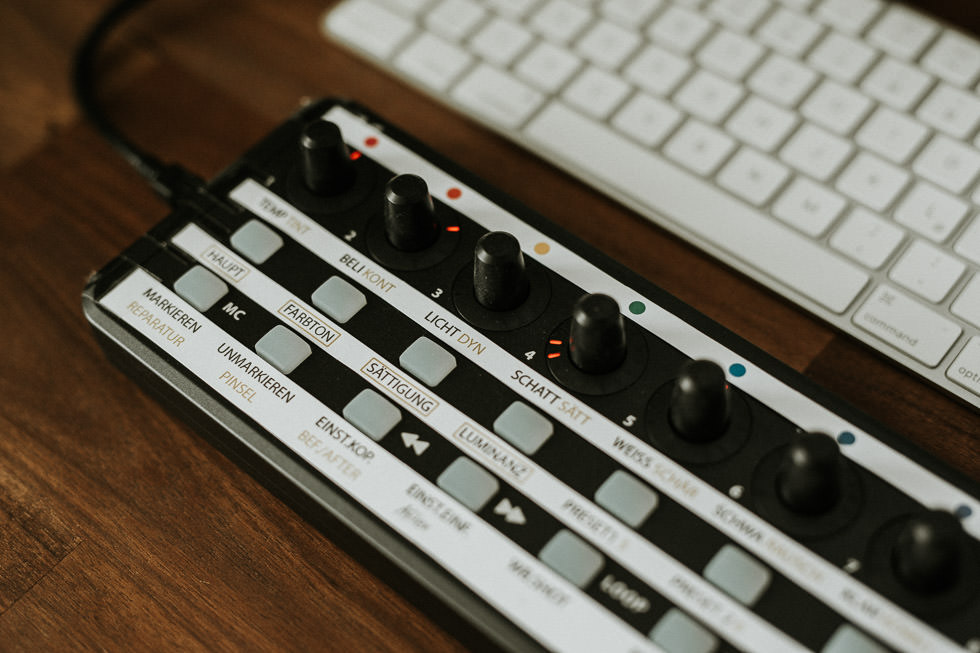
Why have I bought exactly this Lightroom Midi Controller? First and foremost, because there were already many other users and thus the most empirical values about it. The layout was also important to me: It is kept very simple and balanced between knobs and buttons. It has a relatively good workmanship, which is absolutely fine for this price. You can work without slipping due to the four rubber feet. Connection to the computer works via USB and no further power supply is required. No further installation of drivers is necessary (at least under MacOS) and it can be used directly after connection.
If you want to buy another Lightroom midi controller as a Loupedeck alternative, you should only make sure that it also has at least eight turning knobs next to each other. This is necessary because there are always 8 color channels in each of the HSL settings. (Red, Orange, Yellow, Green, etc.)
Another point is that the Behringer controller indicates the position of the knobs via LED lights and has no printed markings. This way, the sliders adjust automatically when you switch to another image (with a different editing and thus new slider settings).
With a printed line on the knobs it would otherwise have to rotate electrically and bring them into the position of the next photo. This is the reason why you can hardly use the physical slider on the right of the behringer, because it always has a fixed position and cannot reset itself automatically.
The eight knobs also offer another button when being pushed downwards. For example, this allows you to change the exposure by turning the knob and if you don’t like it, quickly reset it to 0 by pressing the knob in. Below the knobs there are 16 freely assignable buttons, which light up briefly when pressed.
If you’ve done some rough counting, you’ll quickly realize that these eight sliders and 16 buttons aren’t enough for all of Lightroom’s functions. That is why there is the Layer button on the right. If you switch from A to B here, you can assign all buttons once again and you are already at twice the quantity.

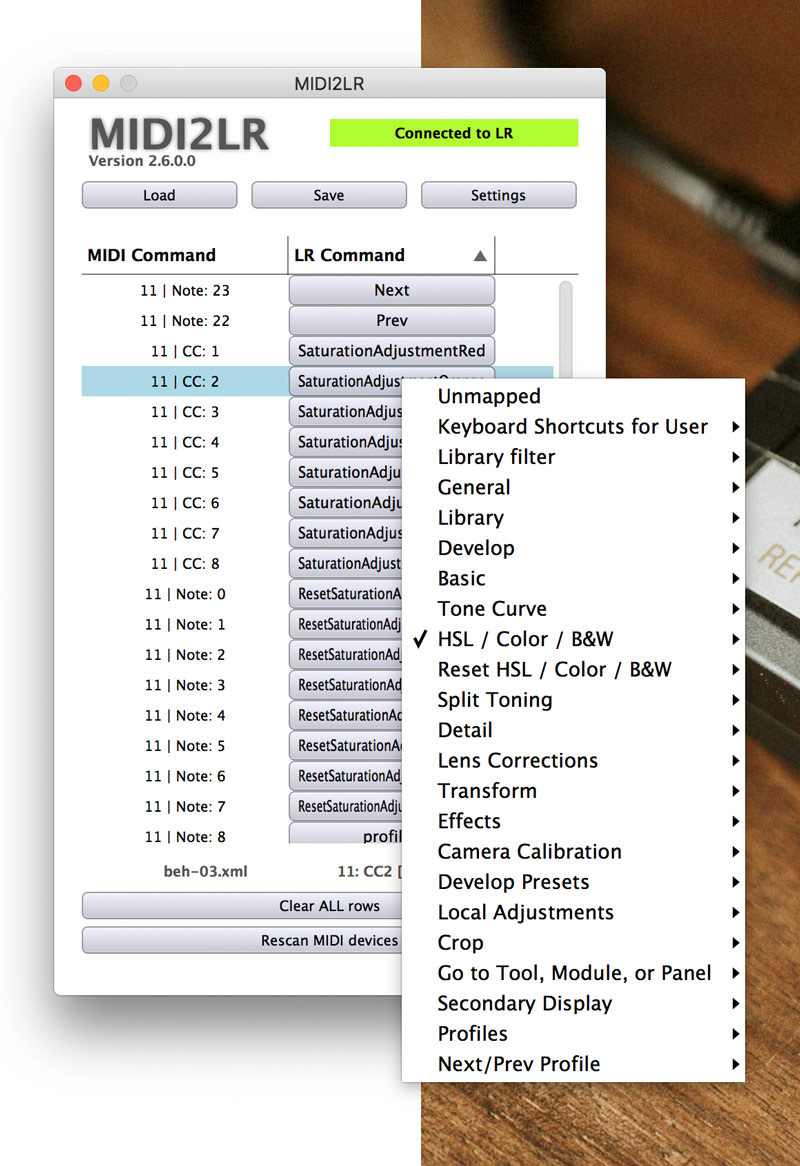
But this would still not be enough, which is why you can create more such layers in the form of profiles later via Midi2LR software.
3. Midi App: Connect the controller via the free Midi2LR software
Now you startet the Lightroom Classic application and the connected controller to your computer. Still Lightroom can’t do anything with it as it doesn’t yet understand what should happen when you turn a slider.
Therefore another small application is needed that connects Midi and Lightroom: It’s called Midi2LR (logically) and is available for free. This program then acts as a Lightroom plugin and from now on starts with every LR program start, so that the controller can be used.
The assignment of the individual keys works now quite simply. Just turn a knob or push a button. Then Midi2LR recognizes the corresponding button and you can assign a Lightroom command. Once you have set up everything, you can save your settings as a profile.

You can set up to ten of those profiles and switch between them by pressing the assigned button for profile switching. You remember the problem that there are more Lightroom functions than buttons – so via these profiles, similar to the Layer function, each button can be assigned multiple times.
This may sound a bit complicated, but it really only needs to be thought through and labeled correctly once during setup.
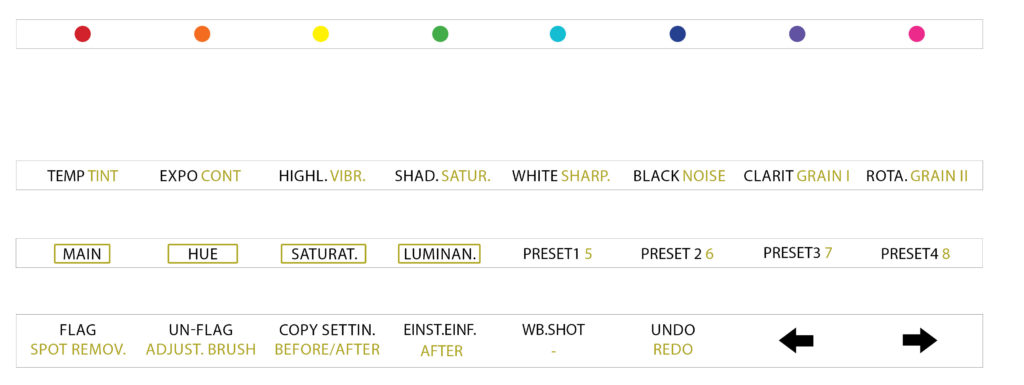
So now I have set up one main profile, where additionally each button is double assigned (through layer A and B). Here are all the important main functions (which is why I have two functions under each button in the label) of Lightroom.
To edit the colors in HSL settings, I additionally set up some profiles to switch between hue, saturation and luminance and thus edit all colors again individually via the sliders. Once I have finished editing the colors, I go back to my “Main”-deck. The Loupedeck has a similar solution, where you can also switch between Hue, Saturation and Luminance.
You can download and try my configuration for free at the end of the article, as well as my labels for printing. This will save you a lot of time. But that’s only the assignment of my personal workflow. It will help you as a starting point. The good thing is, that you can easily customize it to fit your own editing workflow.
4. The labels and basic key assignment
As you have seen, I labeled the controller myself. For the test phase, I recommend simply printing out your preliminary configuration on normal paper and attaching it with adhesive tape.
If the assignments work for you after the test phase, you can print it out on an A4 sticker. Then cut it to size and stick it smoothly on the device. This way you will have a more professional feeling and appearance.

Basically just put a stripe at the top with the different color dots, and a stripe below each row. My profiles “Main”, “Hue”, “Saturation” and “Luminance” are highlighted with a rectangle. And in the “Main”-Profile, each button is additionally assigned twice (via layer buttons on the right). Therefore I use a second color.
The buttons on layer A are written in black, those of layer B in yellow.
5. Workflow: Working with the Behringer Midi controller in everyday use
What does my workflow look like after buying that midi controller? A few examples:
First, I have my arrow keys there normally to navigate through the photos. For “Flag” and “Un-flag” I have set up individual buttons. That’s how I am culling through the photos.
For editing I assigned my four most used presets on the “Preset” buttons to apply them quickly. I assigned my THO Moody Lightroom presets on them. If I switch to the B layer, I still have four black and white presets alternatively.
Once a preset has been selected I go on tweaking the color look to fit onto the photo. Here, all the important controls from Lightroom are available. I always start choosing the right exposure, white balance and rotation by turning the knobs. It’s also nice that I can quickly reset individual parameters by just pressing the knob in. To reset the original white balance I have additionally set up a button for the “original white balance of the shot”.
In addition, there is the function of activating or deactivating the repair brush with the press of a button or switching to the brush with the other button in order to carry out local touch-ups. In the end I can display a before/after view. Standard functions like “Undo” are also on board.
That’s it for the basics – as you can see, almost everything you need in Lightroom is assignable. If you need different functions than I do, you can easily customize it through the free assignment.
6. Free Download: Set Up My Midi Templates and Print Label Template
For a good start with the Behringer controller you can find my resources for download here:
- My Midi2LR profiles for the Behringer X-Touch Mini
- Update 11/02/2019: Midi2LR Profiles for the Behringer X-Touch Mini
- My template to print
The profiles are basically text files in which it is briefly noted which controller is assigned to what. To use it, you only have to change it in Midi2LR under “Settings” the “Profile Folder” specify. This is necessary to be able to switch between profiles at the touch of a button. Initially, you may have to change the start preset (beh-01.xml) once via “Load” be loaded. But from then on it should always start automatically with a preset from the specified folder. If you want to (over)write your own assignments as a profile, this works via “Save”.
Important: You still have to create your desired presets in Lightroom under “File” -> “Add-on module options” -> “Midi2LR development specification” set (slot 1 – 8).
So the profile files beh-01.xml to beh-04.xml you have to enter under “File” -> “Additional module options” -> General options again to be able to use them.
In case Midi2LR should not start by itself, you can start it under “Plugin Extras” -> “Launch application”.
Download the labeling template and print it either on A4 paper or stickers. The only important thing is that it is printed in actual or original size. Then it can be cut and fixed to the device.
7. Conclusion: For whom is Lightroom operation via Midi worthwhile?
Working with a midi controller in reality turned out to be just as nice as I imagined before. I am glad I did not have to spend 300€ for it. After a short setup up time the universal Midi Controller works just as good as as professional Midi Controller like Loupedeck. But you can even further customize it to fit your own workflow better. Since it has no fixed labels, it’s easy to print out new labels if you want to change your workflow later on.
It happens not often, but now and then Midi2LR occasionally crashes. Don’t worry: If that happens, you can restart it within seconds.
But that doesn’t change the fact that I can recommend the device for any Lightroom users. Especially those who edit many photos in a series or wedding reportages benefit enormously here. The time you will save makes the already low price for the midi device a real bargain.
In addition to the increased speed, I think it is much more comfortable to be able to feel the controls directly in my hands and not have to take my eyes off the image so often.
If you want to try it out yourself (for the money you can’t go wrong), you can order the Behringer X-Touch Mini Controller here*. Due to the current Lightroom hype, it is often sold out – then it is best to order directly if possible to be sure to get it with the next delivery.
Update 06.12.2021: the Loupedeck alternative is still in daily use
I am using the Lightroom Midi Controller together with Midi2LR in the latest version on a daily basis for over two years now. The controller still works like on the first day. In the meantime, I have printed the inscription on an A4 sticker as announced to look a bit nicer on the device.
Here’s what I noticed about the workflow: I actually only use the main deck in quick use. I rarely switch between layers or profiles. My workflow looks like this: In Lightroom I copy a preset onto a whole photo series.
After that, I actually mostly just use the following buttons:
- Color temperature (white balance)
- Exposure
- Image rotation
After applying the preset to all images actually always make only basic adjustments. This makes my workflow faster than pushing through the individual profiles.
Conclusion 2021: Since I bought the controller in December 2017, I have not regretted it for a second. If it broke tomorrow, I would order it again.


